
January's Relief Society Activity Night was so much fun! It was so nice to visit with each of you and have a girls night out! We learned how to "create" fabric flowers and they turned out so cute!
Fabric Flowers

1. Use the pattern to cut out the number of flowers needed as indicated on the templates in your chosen fabrics. Cut into each flower where the dotted line indicates.
2. Stack the two large flowers on top of each other.
3. Fold each of the smaller flowers in half and lay them on the larger flowers, overlapping them.
4. With needle and thread, make small stitches at the center, through all layers, to secure the flower petals and hold everything together.
5. Attach button to the center of the flower.
*Pattern for flower: http://blairpeter.typepad.com/weblog/files/fabflower290.pdf
Rosettes
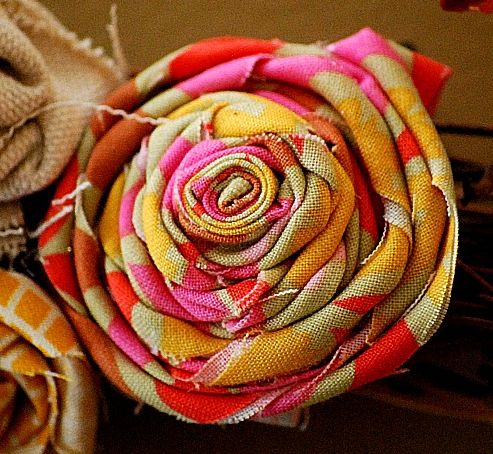
- Cut a strip of fabric 2 inches by 22 (longer the strip, bigger the flower)
- Fold the fabric in half wrong sides together and tie a knot at one end. The knot will be the center of your flower.
- Start twisting the fabric around and then twist that into a circle.
- Keep twisting around and around, tighter the twist, the smaller the flower.
- Hot glue as you go and then cover the back with glue when you are done.
Satin Posy

- Cut out 5 or 6 circles out of satin, gradually making each circle smaller, make sure they fit on top of the circle just larger than it. Don’t worry about making the circle perfect.
- Use the flame from a candle and slightly melt the edges of each flower, making the edges curl up a bit.
- Then, one at a time, hot glue each circle to the one below it to create a layered flower.
- Then hot glue any embellishment you want in the middle (beads, buttons, etc)
Frayed Fabric Flowers
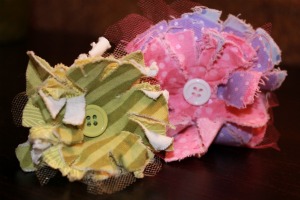
1. Collect 3-4 different fabrics of coordinating patterns. T-shirt material curls well, and netting adds good texture.
2. Cut 5-9 circles of your fabric.(You can do 2 or 3 of each pattern). Make each circle slightly smaller than the first.
3. Layer your circles from big to small.
4. Stitch and x in the center to tack them down and hold the layers together.
5. Cut into the center- leaving 1" circle in the middle (where your x is).
6. Place under running water and rub in your hands to get the fibers to fray.
7. Place in the dryer with a large towel for 10 minutes.
8. Add a felt circle to the back with hot glue to hide your stitching and give it a clean look.
9. Attach it to your headband, hair-clip, purse, etc.
* For a stiffer look to your flower: after taking it out of the dryer, place it on a square of wax paper, spray with Laundry starch and place in the microwave for 10-20 seconds. Watch it closely to prevent burning and netting or other fine fabrics. Then continue with adding felt backing and hair clips.
No comments:
Post a Comment